customizing .docx document templates
Customizable document templates are an advanced feature, and they allow you to personalize the design and styling of documents generated on the platform. Examples include customizing content and layout of your Bill of Lading documents and invoices. transloads.co provides default templates designed to meet the industry standards and best practices, so you don’t have to do anything to get started, unless you choose to personalize. By downloading the default template from here, you can use it as a starting point for customization to meet yours, or your customers’ requirements.
Customizing a template requires basic scripting skills and knowledge of Microsoft Word, Google Docs, or any other docx-compatible document editing software. Formatting and styling applied in the document editor will be preserved and applied to the dynamic fields, thus not requiring any special coding or scripting.
All data fields of a selected object, such as Outbound Shipment, are available for generation of a related document, a Bill of Lading, in this example. This includes all custom fields defined at the Outbound and Inventory/Product levels. To obtain data model and available data fields, use the “HELP” button while editing a target outbound shipment. The help file contains a list of fields available for this Account.
STEPS:
Our customer success experts are available to assist you with your scripting needs. Just email us at support@transloads.co
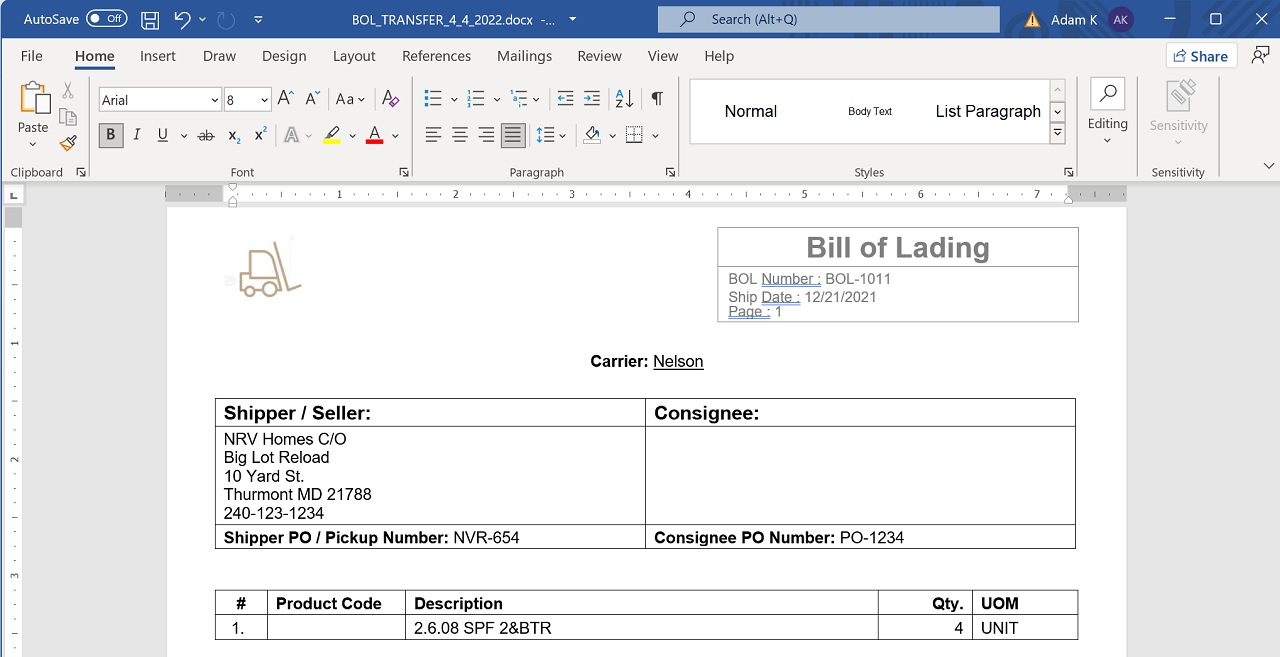
STEP 1: Download Template
Download the Bill of Lading template and save as an Word (.DOCX) file. Open to edit.
STEP 2: Review Scripting Tags
The scripting language has been designed for business users. As such it assumes the template editors do not have any technical background and certainly no programming experience. In order to stay business-user friendly, we keep the template syntax as simple as possible, limiting the required knowledge to {content tag}, {#loop tag} ... {/loop tag}, and simple {#conditional tag} ... {/conditional tag} expressions.
Content Tag
Provides a placeholder for a single custom text. Text is any alpha-numeric value. This tag preserves the original text style and formatting.
Input Template:
{accountName} C/O
{reloadYard.name}
tel: {reloadYard.phone}
Input Data:
{
    accountName: "NRV Homes",
    reloadYard.name: "Big Lot Reload",
    reloadYard.phone: "240-123-1234",
}
Output Document:
NRV Homes C/O
Big Lot Reload
tel: 240-123-1234
Loop Tags
Iterates text, table rows and lists. Requires an opening tag that starts with {# and a closing tag that starts with {/.
Note: The closing tag does not need to have the same name as the opening tag, or a name at all. This will work {#loop} ... {/loop}, but also this {#loop} ... {/} and even this {#loop} ... {/something else}.
Input Template:
#    Product Code              Description         Qty.
1.  {#lineItems}{productCode}  {productName}       {quantity}{/lineItems}
Input Data:
{
    lineItems: [
        { productCodee: "123456789", productName: "2x4x08 SPF 2&BTR", quantity: 4 },
        { productCodee: "987654321", productName: "2x6x10 SPF 2&BTR", quantity: 10 },
    ]
}
Output Document:
#    Product Code              Description         Qty.
1.   123456789                 2x4x08 SPF 2&BTR    4
2.   987654321                 2x6x10 SPF 2&BTR    10
Conditional Tags
You can render content conditionally depending on a Boolean value using the same syntax as used for loops. The example below shows two lines being rendered, each with different content depending on the truthy value of the input variable.
Input Template:
{# emptyWeight > 0}
Tare Weight: {emptyWeight} {weightUnits}
{/}
{# loadedWeight > 0}
Loaded Weight: {loadedWeight} {weightUnits}
{/}
Input Data:
{
    emptyWeight: 1000,
    loadedWeight: 0,
    weightUnits: "Lbs"
}
Output Document:
Tare Weight: 1000 Lbs
Image Tag
Embed dynamic images into the document. The Image Tag is a special case of the {content tag}. Currently, we offer 3 dynamically embedded images: {logo}, {yardSignature}, and {carrierSignature}. Logo is populated from My Yard > Settings > Attachments tab, so if it is not uploaded, the tag will result in a blank space. Signature tags are populated from digital signatures collected during the Outbound Shipment process, so if the document is generated before signature were collected, the placeholder will result in a blank space.
Aside from the dynamically embedded images, you are also able to insert a static graphic directly into the document template, using your document editing application.
Input Template:
{logo}Output Document:
Scope resolution
The scripting language supports tag data scoping / nesting. That is, you can reference “shallow” data from within deeper in the hierarchy similarly to how you can reference an outer scope variable from within a function in JavaScript. You can leverage this property to declare “top level” data (your logo and company name or some useful xml snippets like page breaks, etc.) to be used anywhere in the document.
Input Template:
#    Product Description         Qty.          Units
1.  {#lineItems}{productName}    {quantity}    {units}{/lineItems}
TOTAL: {totalQuantity} {units}
(notice that we are using the {units} tag inside the {lineItems} loop, even though units are declared outside of lineItems below)
Input Data:
{
    totalQuantity: 224
    units: "MBF"
    lineItems: [
        { productName: "2x4x08 SPF 2&BTR", quantity: 112 },
        { productName: "2x6x10 SPF 2&BTR", quantity: 112 },
    ]
}
Output Document:
#    Product Description   Qty.    Units
1.   2x4x08 SPF 2&BTR      112     MBF
2.   2x6x10 SPF 2&BTR      112     MBF
TOTAL: 224 MBF
STEP 3: Upload Template
Once you are done customizing your template, save it as a .docx document and upload it to a select Account, under the Custom Settings > Document Templates tab. Feel free to reach out to our support team to help you test the template before uploading it. Once uploaded, the system will switch to using your custom template for that Account, instead of the default document template.
Related Content
what’s new in ver. 0.4.4
what’s new in ver. 0.6.0

what’s new in ver. 0.9.80
Markdown Help !!!